If you ever have wanted your very own professional grade golf putting green then you have stumbled on the right place. You can have a custom built golf green right in your backyard, inside your home, office or your place of business and even a rooftop installation if you like. Design ideas are limitless and can be created to fit any area of your choosing.
Benefits of Choosing A Synthetic Custom Built Golf Putting Greens
* Realistic Golf Putting Surface That Behaves Just Like Top Golf Courses Greens
* Virtually Maintenance Free
* Never Needs Mowing or Watering
* No Chemicals Needed
* No Sand Needed Ever
* Manufacturers Warranty
Along with your custom installed green you can have all of your landscaping around the green modeled to fit the golf theme. So it will be ready for your pleasure without having to do any additional work yourself. You can add reataining walls, brick pavers and other hardscape features to your new custom builr putting golf green.
You may be asking yourself why should I invest in this synthetic panel putting system over a sand filled system. The answer is simple, a sand filled system especially in winter climates is subject to the freezing and thawling of ice, which in time will cause the surface to shift, divot, develop low spots, putting holes can shift and the green can loose its putting speed. With this system this could never happen since the greens are backed with the panel system that is unaffected by weather, ever!!! It is the most consistant putting green surface on the market today and it truely is a maintenance free golf putting green that will last you for many, many years.
Sunday, January 16, 2011
Thursday, January 6, 2011
Masonry Restoration Techniques And Methods
New masonry buildings rarely are built the way they used to be and we should preserve and maintain our older masonry structures, because like the saying goes ”they don’t build them like they used too” is very true in the masonry business. Very rarely do you see large all real stone buildings being built anymore just because of the high cost of real stone and the amount of labor involved in laying very large stones. If you have an old masonry structure that’s need to be restored there are many steps you must take to repair and restore it. Old Masonry Structures made of real stone and antique brick are very rarely built anymore and to preserve what is left it must be maintained.
The first thing you should done in any masonry restoration project is thoroughly clean the surface with a soft acid wash and/or a pressure washer. You must be careful not to add to much acid to your solution to ensure you do not damage the brick or stone. You should then scrub with a firm bristle scrub brush to remove all the loose dirt. If you are skilled with a pressure washer this would also work, you just must be real careful not to damage the surface with the high pressure water stream. It is very easy to blow the face off of old brick and soft stone like sandstone.
The next thing that you may need to do is a good tuckpointing job on the entire surface. You really should do the whole wall or structure because if you just grind out the bad areas you will notice a difference in the color of the patched areas. Doing the whole surface will ensure a quality job that matches entirely and odds are anyways you will have to eventually tuckpoint the other areas as well further down the road anyways.
While you are tuckpointing you should also remove any replace any broken, cracked or missing masonry units as well. You should really do the replacement work as you go so your mortar color stays consistent with the surrounding mortar joints. Bad masonry units are one that are cracked, spalling or just plain falling apart. Special care must also be taken at the caps of masonry walls if they are capped with concrete or stone, this is the first line of defense from water damage and deterioration. If the cap has been compromised your wall can quickly be destroyed from the elements of rain, snow and ice.
On really bad crumbling walls they may need to be reinforced with wall anchors that are drilled in with a metal anchor bolt set in a special epoxy to hold it in place.. Other techniques such as wall reinforce with galvanized mesh must also be implemented for crumbling stucco walls. Other things that may need replacement are steel lentils over windows and doors. These can be especially dangerous if not properly reinforced and braced up during replacement.
Restoring our old masonry structures is very important in preserving our historic buildings and should only be attempted by skilled tradesmen that have been in the masonry field for a very long time. If you have a building you would like to restore do not wait long to restore it, the longer you wait the more damage it will absorb and it will cost you more later than sooner so don’t wait, get it fixed now and not later.
Sunday, January 2, 2011
Chimney Problems, What To Look For.
A chimney is probably one of the most ignored and poorly maintained structures on a home mainly because of lack of access and most people have a fear of heights. Things to watch for if your chimney is having problems is crumbling mortar joints, cracked or broken brick, a cracked or missing crown on top of the chimney, a leaning chimney(which is really bad) and water damage inside your home around the chimney. You should contact a chimney repair or mason contractor to fix your chimney problems.
But if you are up to the challenge here is what you will need to do, first depending on how bad it is most chimney problems can be fixed with a little chimney tuckpointing. You will first need a good grinder, not a cheap $20 on either, buy a Dewalt or Hitatchi for about $120.00 then you will also need to purchase a good diamond 4 inch wheel to go on it, they will run you about $65.00. You will also need a 3/8 or a 1/2 inch tuckpointer,a groat bag, a few 5 gallon pails, wheel barrow, hoe, ladder, and possible scaffolding, shovel, striking iron and a masons trowel.
Start by grinding out every mortar joint as deep as you can get the blade in, be sure to wear safety glasses and a mask if not you will regret it later. After all the joints have been ground out take your brush and clean out all the joints thoroughly. Next you will need to mix your mortar, after it is mixed it is easiest to use a grout bag to fill the joints, which resembles a large cake decorating bag if you don't know what one is. Be sure your mortar mix is fluid enough to flow through bag but not too wet where it has no body or else you will have a huge mess on your hands. Depending on temperature you have to check your joints frequently to see if they are ready to be struck with a striking iron or a rake. After you have struck or raked your joints brush them down to remove loose mortar and clean up the chimney.
Next check the concrete cap, if it is cracked then it should be replaced and a new one should be poured in its place that is at least 4 inches thick. you can accomplish this by building a form out of 2x4's and 2x6's. If you make your wood just a tiny bit smaller than what is needed you can tighten the form up to the chimney without drilling any holes into it, otherwise you will need a masonry bit and masonry screws to firmly attach the form to the top of the chimney. Mix up your concrete mix and pour it into your form tapping it lightly all over to eliminate air bubbles. After it sets pull form and fill any holes that may be apparent.
After that task is completed check the chimney flashing and be sure it is installed correctly and is hole and crack free or it may need to be caulked up or replaced. Then clean up your roof with a broom or hose but if using water try not to spray your chimney till its dry. That's pretty much how a brick tuckpointing job is done for an existing chimney, if you are unsure of any of the above task you really should have a mason contractor do the work for you.
Friday, December 31, 2010
How To Install A Brick Paver Patio
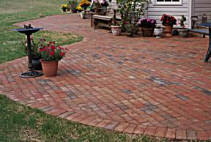
Most people would love to have a brick paver patio in there backyard but don't want to pay a contractor to do it, If you have the ambition and time you can probabally build one your self for a lot less.
First you need to make sure your yard is compatible to have a paver patio built, it should be fairly level with good solid soil and not many trees, preferabally no trees. Once you have surveyed your yard its time to get digging, all vegetation such as grass and plants have to be removed where your are placing the patio.
The next step is to dig down about 4 inches to cut out the rough shape of your patio, be sure you are pretty level. To check for level you can use a large level or go buy a cheap line level that you can attach to a line and pull it across just above the work area to check for level by measuring down from the line. After this is complete your going to need some stone, you want to get the crushed stone mix, if you tell the supplier what you need them for they should now what type of stone you need and how much with your project dimensions some refer to it as 4/11 stone mix.
Next you will need to drive wooden grade stakes into your work area, roughly one every 4 ft and be sure it sits about 4 inches out of the ground. Pick one corner stake and be sure the rest of the tops of the stakes are level with it so to be sure you will have a good level surface when your are done. Next Spread your stone so that it is level with all the tops of the stakes, this will require some hard work so be ready. Next you will need a stone compactor, run the compactor over the stone till it is all good and smooth.
After this is complete you will need plenty of masons sand, a long straight 2x4, 2 pieces of 1/2 inch metal or copper tubing and a level. Tubes don't have to be exactly 1/2 inch just close. Next place you tubing parallel with each other about 7ft apart on top of the stone, spread your sand in between and on top of the tubes. next put you 2x4 on top of the tubes and pull it towards you which will make all the sand at about 1/2 thick with a level surface.
Pull your metal tubes when you have completed this task and start laying our pavers on top of the now smooth level sand. Continue this process until you have completed entire area. Now with pavers in place get paver edging strips and place them firmly against the pavers and stake them in until entire patio is surrounded. Now get some paver sand, silica is best and spread it over entire patio with a broom until you can no longer see any cracks between pavers. Then take your compactor on last time and run it across the surface of the patio to get everthing good and flat. and thats pretty much it, if you are unsure what to do still you should either watch some videos on this subject or hire a landscape design contractor.
If you need assistance in designing your landscaping then try out this easy to use program that will benefit you greatly in laying out your dream yard.
How To Build A Masonry Mailbox
Have you ever wanted a masonry mailbox built out of brick, stone or marble, if you have then your in the right place to learn how to build your very own brick mailbox or a stone mailbox. I will go over all the materials and tools needed to complete this project and approximate costs.
I am going to go over the brick mailbox because it will be easier for you to complete. First you will need your design layed out, the simplest way to build your maibox is a 24 Inch square with a 16inch block pillar in the center. Next you will need to gather all your materials, you will need 3, 80 pound bags of Quickcrete, 16 8 inch block and 12 4 inch block and then roughly 200 brick of your choice. You will also need to pick out a good sturdy steel mailbox and a piece of sandstone that is 26 inches square and 4 inches thick for the top cap. The tools you will need are a good digging shovel, wheelbarrow, hoe, trowel, hammer, striking iron and and masons brush.
Step one, dig down 36 inches and 4 inches bigger than your mailbox base in the above example you would dig a hole that is 32 inces square. If you are on a street with underground utilities running along the street you are only going to be able to dig down no more than 12 inches, you will have to check with your utilities to find this out. Ideally though you should make it 36″ deep to clear the freeze line, especially if you live in the north.
Next prepare your footer by driving a grade stake down into the center of the hole 8″ off of the bottom, this will be the thickness or hieght of your footer. Now mix your quickcrete thouroughly and pour it into the hole till you just cover the grade stake, try to make footer as level as possible, it may be somewhat difficult especailly since you will be reaching 3 feet into the ground. Now let your footer set up and return the next day to build your mailbox.
The next step in the process is to build the center block column our of the 8 inch block and 4 inch block. find the center of your footer, mark it and measure 8 inches each dirrection, this will be where your main culumn will set. After you have marked out your square mix your mortar and start laying block. Place two 8 inch side by side and try to make them as level as possible, first course is most important, if you can’t get it level in the first course be sure that you are level and straight by the third, which should place you right at about 4 inches below ground level, now continue to lay your block up 5 more courses, be sure that these are straight and level. After you have layed these you need to install your brick ledge, you do this by using the 4 inch block. Place the block around the base of the column as close to the column as possible up just three courses which should place you at once again 4 inches below grade.
Now that your column and brick ledge are in place its time to install your brick. Run your brick on top of the brick ledge which should work to fit the brick perfectly. Be sure to switch bond every course to make sure you are left with a nice looking brick job. Every course check for level and plum to be sure that your mailbox is not leaning, and then strike your joints every 2 to 3 courses as well, so they dont get two hard on you. If you are installing brick correctly you should have 3 courses of brick to every course of block, so if you layed 4 courses above grade then you should end up with 15 courses of brick. to the top of the block column.
Now it is time to install your mailbox, take your mailbox out of its packaging and place it on top of your colomn and brick with the face of it facing the road, test open the door to be sure that the brick below is not interfering with the door. Your mailbox door should be resting approximately 1 to 2 inches off the face of the brick. Now continue to lay your brick up and past your mailbox, you will have to make cuts with a saw or with a hammer if you are skilled enough to do it. Be sure to fill mortar in around mailbox to lock it in place.
After you have struck all your joints and brushed your work down it is now time to install the cap, you can do this with brick or buy a piece of sandstone that is 4 inches thick and that is 1 inch bigger on all sides of your masonry column, in the above example the sandstone should be 26 inches square. Run a bead of mortar all the way around your top course, now place the sandstone lightly on top and level it up, remove excess mortar and vwela you have yourself a brick mailbox, If you are skilled enough you can do the above project with a stone veneer, but it is only recommended if you are familiar with the masonry trades.

Sunday, December 5, 2010
How To Fix Masonry Steps
Do you have crumbling, cracked, chipped or just plain old ugly concrete steps at your entrance way, well if you do we are going to talk today on how to fix them and give your entry way a much needed face lift and how to repair concrete steps.
This was a recent job that I did and I am going to go over all the steps necessary to to a concrete step repair or a brick step repair job. The steps we are going to fix were made of concrete and brick together that have fallen apart and are in need of repair. As you can see there is alot of work that needs to be done here so lets get started. This picture was taken after the demolition had begun but you can see there is alot of work to be done.
Once your demolition work is done be sure to remove loose debris so you are ready to start laying brick. Purchase a Brick paver with smooth sides for this project so it looks nice and durable, Brick pavers have no holes in them and are very hard so they are perfect for steps and walkways and even driveways.
Start by laying two courses where you want your steps to be located. Be sure on curves that you cut the back side of the brick off so you can keep you joints tight when making turns, if not you will end up with a mortar joint that is 2 inches wide that will not look good. After you have your first two courses in strike them up and prepare to do the first step top. you want your steps to be about 12 inches wide so be sure that you left your self enough room to accomplish this. In my step I used 1 full brick and a half which gives me a 12 inch step.
In my step now there is a 12 inch step that sits about 8 inches off the porch which is perfect for step height. Be sure that all your joints are full as you go along and most importantly use your level frequently, Your step should be perfectly level from left to right and have a slight slope down towards the porch deck so water sheds easily off of the steps. Be sure as you go along the steps that the base under neeth is filled solid with concrete or mortar to ensure a good strong long lasting base. you can use some debris from your demolition to help reduce the amount of fresh fill needed just be sure that the debis is a masonry unit of some sort and thta is not crumbling and be sure to completely encase it in fresh mortar or concrete.
Now it time to run your second step which will include your top deck which should be big enough to open your door and give yourself plenty of walkway space. Once again lay down your two courses and then once they are in and have set up fill the area in between with mortar or concrete. Once thus step is complete you are ready to start your top deck.
The first thing you should do is layout the cuts you will need if you have an arch on your top step, This can be a time consuming process but is will be needed to be done if you want your project to look right when you are done. When possible if a large peice is needed to be cut off to make the turn try to split the cut between two brick so it isn’t so noticeable.
Once this is complete lay your perimeter row of brick in first, it is very important that this is level from left to right or you may find your self in big trouble when you finish the center of the deck. After you have the perimiter in place strike it up and prepare to run the center brick in to fish your project.
Start along the house and run your brick left to right, start with a half of a brick to beak up the pattern a bit. Then lay in your next course by starting with a whole brick so you will end up with a staggered bond pattern and not a stacked bond. Be sure to tuckpoint as you go any open joints and strike all the joints when they are set up, brush them down and strike them again
Once the job is complete wait one day and get some masonry cleaner, muratic acid works the best but it is a bit dangerous so be sure to wear proper safety gear to protect yourself. Apply the acid with a brush and scrub smears off with a good hard bristel or wire brush.
How To Rebuild A Chimney
If you need chimney repair and it is beyond the point of repair for chimney tuckpointing it must be tore down and rebuilt, and there are a few things that you must do to ensure that your new chimney will last for years to come.
The first thing you must do is select the proper building materials. You should use a brick that is solid with no holes in it this will increase its durability. Bricks that are cored (with holes) tend to have a much shorter life because moisture can build up in the hole cavities and break down the brick and mortar joints from the inside out, this is especially a problem in colder regions. So be sure to pick out a solid brick if you can.
Next the chimney needs to be tore down. You first must protect your roof from falling debris, do this by placing a cloth tarp down over it around the chimney. You should really use cloth tarps because plastic vinyl ones can be slippery and you don’t want to slip and fall, it could result in serious injury or death. After your tarps are in place start by removing the concrete cap first, the concrete cap must be first or you risk a avalanche of heavy masonry units falling all over the place and possibly through your roof. You may have to use a partner saw to cut it in sections first before picking it up, they can be very heavy.
Next thing after the concrete cap has been removed is to start removing brick. It is best to use a small hammer drill for this with a pick attatchment on it and just focus the pick on the joint below the brick you are removing till it breaks free and you can grab it. Depending on the roof pitch and placement of the chimney you should use a bucket to put debris in or if you are confident it is safe below you can throw the brick down to the gound in a designated roped off area below. Be sure to remove the center clay flu liner if there is one, as well as you work your way down, but try not to break it, odds are you will send debris down your chimney shaft which is not a good thing and it will have to then be cleaned out. The brick should be removed down to just inside your roof line unless its really bad you may have to reach down further or do a little work inside the attic to get it to a secure rebuild point.
Now that your ready to rebuild be get your new building materials up to your work station and start laying in brick. it is very important to keep the courses level and plum to ensure a good looking and lasting chimney. If you are using clay flue liners put one in place as you go, once it is secured by brick all the way around it up to the top then place your next one in place and continue the process till you hit your desired height. code for most areas is 10 foot from nearest roof line and then 2 foot above that for proper drafting of fumes, Generally in most cases if you build it to the same height it was you should be ok, but be sure to check your area code just to be sure.
After all your brick and flu liners are in place you need to pour a concrete cap, this is one on the most important features of your chimney and it should be done correctly to ensure a long lasting chimney. Yor flu liner should be sitting about 6 inches above your last course of brick, next build a form out of 2×4’s around the top course of brick, fill your form up with concrete till you reach the top of your form, Put a slight slope on the cap from the liner down to the edge of form for good water shedding. Also tap your form lightly as you fill it to help reduce bubbles in the pour. After it sets up for a bit say a few hours pull the form and smooth off the edges of it with a small concrete float to seal all holes and to also make the cap look nice.
After that is complete install a draft cap, or also called a bird cap to finish off the chimney. One of these is needed to reduce the chance of back drafts pushing fumes back into your house and they also serve to rain out and to keeps small animals out as well. They can be picked up at just about any home improvement store and are relatively cheap. You must also install your flashing around the base of chimney as well to ensure that is is sealed and water tight.
Subscribe to:
Posts (Atom)